Sunday, September 2, 2012

Fixing the Certificate Error on Nokia serious 60v5 (like Nokia x6)


Hello guys here I am with an interesting topic..

This topic specially for who use Nokia serious 60v5 phones, sometimes when you try to install new applications to your phones you’ll get a massage blinks on the screen saying  " Certificate error!" or "Certificate date expired!", "application untrusted supplier contact the vendor!" these errors are called as certificates errors, Here we are going to fix that error in an easy way…. Follow the following steps….!!!


Ok to fix that error first of all you need to download the following file first

Download: http://adf.ly/CVeqe

Ok, now follow the steps carefully given bellow

Step 1:  Connect the phone using USB cable and select the connection mode as Mass Storage

Step 2:  Unpack the above download and find the file called Private and right click on it and copy it

Step 3:  Now go the memory card and paste it into it

Step 4:  When finished install the Dr.web into your mobile phone and launch it

Step 5:  When its ask for a license key press Cancel

Step 6:  Now go to option > Select "Quarantine" > In the Quarantine section, you'll find 3 files (if you've successfully completed step 3)

Step 7:  Now go to "Options” > Select "Select all" > (now all three files must select)

Step 8:  Again go to option > select “Restore”

After restoring, there will be no files in the quarantine section. This step ensures your success. So if you've done all the previous steps you are 99% done…Here is the rest 1%. :P .
                    
( but if you find 6 files you have already setup the phones to the step 6 if so just follow the steps from here (from step 9))

Step 9:  Now install and launch the ROMPatcher+ which in the downloaded folder and go to option now selects “All Patches” and finally “Apply” Now if you've done all these steps according to the direction then you'll see blue icons (arrows) have changed into green icons.

OKKKKKKKKKKKKK you done….now you are free to play with your phone…

Don’t forget to leave a comment if it’s helpful
  Here are some sites you can find some cool apps to your phone free of charge

http://adf.ly/CVgX0http://adf.ly/CVgel


A SIMPLE THANK WILL MAKE MY WORLD….!!!
           

Wednesday, August 29, 2012

How to change Logon Screen of Windows 7….!!


Hello Guys here I am… 

Today I’m going to share some interesting topic with you, you all like to have a some customize logon screen on your windows 7, there are many software to do that but here I’m going to tell you how to customize your logon screen manually (without using any software tool using software tool may harmful when you uninstalling the software to reset your logon screen) .here are the steps….
BUT REMEMBER HERE WE ARE GOING TO CHANGE THE REGISTRY VALUSE SO DO THE EXACT AND SAME THING THAT I’M DOING…


Step 1
                First enter to registry editor on windows 7 to do that, Start > all programs > accessories >run then in the RUN dialog type regedit and then  press OK. Now it will open registry editor.
Step 2
                Find the HKEY_LOCAL_MACHINE and clock the arrow in the left side, then find the software and click the arrow > Microsoft > Windows > Current Version > Authentication > LogonUI >
Step 3
                Now inside of LogonUI you can see a folder called Background, then select it and in the right side you can see the registry values in background folder now we need to add new values to it
Step 4
                Right click on the free space in the registry editor > new > DWORD (32 bit) value
Step 5
                Now rename the created value as OEMBackground, then double click on it, you will get a dialog box called edit DWORD VALUE in the dialog box change the value data to 1 (by default it has 0)
Step 6
                Now press OK button and close all windows
Now you need to place the image that you are going to use as the logon screen to do that follow these steps


Step 7
                In your HDD, go to windows installed partition, (normally it is c: Drive) C: > Windows >System 32 > oobe  then open the oobe folder  right click on the free space and create a new folder and re name it as Info
Step 8  
                Open the Info folder and create a another new folder inside it and rename it as backgrounds
Step 9
                Now any image from you PC (file must be in jpg file format), copy it and paste it into backgrounds folder that we created and rename the image backgroundDefault restart your Computer

Congratulations you are done……
If you need to change the picture simply copy new picture to the backgrounds folder in Info folder and rename it as backgroundDefault
If you need to change the logon screen to it default  logon screen change the OEMBackgroun value to 0, and go to the oobe folder and delete the Info folder that we created .

Ok guys see you soon…… don’t forget to leave a comment….. A SIMPLE THANK WILL MAKE MY WORLD

Fast File Copy For Free........

OK guys....
here I am again with a new and Interesting topic......... So you need to copy files in to your Hard Disk Drive as soon as possible or very faster....here I am going to tel you about a best and free software that help you to Copy your files very fast...and good way to manage your files too...by using this amazing software you can also avoid file duplication and it save your time.....
go to below link and download your free copy and enjoy...!!!!

here is the link

http://adf.ly/CM53D  


don't forget to leave a comment if this helpful to you......... A SIMPLE THANX MAKES MY WORLD....

Tuesday, August 28, 2012

Earn Money through Internet

Hi Guys and Gals ......


here I am....with some interesting topic...u all guys need money....so do you ever think that you cam earn money through internet...???? yes you can.....here is what you need to do...

1. go to one of following link and register here are the links


2.Affeter registering DO NOT forget to complete your profile with the  true details and full details.. Remember Complete profile can make good profit..

3.Remember to add SKILLS you have ,to your profile
4.Now you can bid on the projects posted by people.
5.if you got a project approved then you can earn money ..
6. after that you need to transfer money to your country or pay pal account to do that go to following link and register their with TRUE DETAILS otherwise you cannot get the money

http://adf.ly/CLY5p

OK guys and gals then try and make money through Internet.........GOOD LUCK...!!!  


Sunday, August 26, 2012

Is your Computer Male or Female... Wanna check it?

OK guys.....,

Wanna check gender of your computer??? its very simple just follow below steps,

1.Open Note Pad
2. Type the below statements in the notepad
       CreateObject("SAPI.SpVoice").Speak"I love you"
2. Remember you can type any thing inside last double quotes  in here I type "I love You"
3. Now Save any ware in the computer, give the name and file extension as follow
       gender.vbs
4. You done now go and double click on the saved file, if it speaks like male you got a male computer if it speak like female you got a female computer.....


Thursday, August 16, 2012

How to Install Windows 7 and 8 using a USB Flash Drive


Installing Windows 7 Using Flash Drive


Physical DVD drives are becoming a thing of the past as the size of our PCs continue shrink and new form factors are emerging. Microsoft distributes Windows 7 and Windows 8 on physical discs or images of DVDs called ISO files that are typically burned to physical media. This has become problem as a number of laptops and tablet PCs no longer ship with DVD drives. The best way to install Windows on these devices is to use a USB flash drive that contains the Windows installation files.  As an extra benefit, modern USB flash drives are typically much faster than DVDs resulting in a quick install.
Before we get started you will need:
  • Windows 7 or Windows 8 ISO file and WinRAR  or a burned DVD with the install source files
  • 4 GB USB flash drive for Windows 7.  You may need a 8 GB USB flash drive for some Windows 8 images. 

Option 1 - The manual Method


Step 1 - Preparing the USB flash drive


Let’s get started. First we need to format the USB flash drive to erase any existing data on the drive.  Click on the Start Button and then Computer to bring up your drives.


Next, right click on the removable USB flash drive and select Format.

Click Start and the USB flash drive will be formatted.


Step 2 - Preparing the source files


Now it is time to extract the setup from a Windows 7/8 ISO image file.  If you have a physical Windows install DVD then skip to step 3.

To extract the files from the ISO file you will need WinRAR. If you do not already have WinRAR download and install that now.
Once you have WinRAR installed navigate to the ISO file in explorer and right click on the file and select the bottom Extract to <folder name> option.

The ISO file will now be extracted to a sub-folder with the same name as the ISO file. This can take a few minutes to complete.


Step 3 - Copying source files to USB flash drive


The final step is to copy the install source onto the USB flash drive in a way that will allow the Windows 7/8 install to boot up. The trick here is to use XCopy.  Depending on where your source files are located there are two different methods to copy the files onto the flash drive.


Using extracted source files


Open up command prompt and navigate to the directory you extracted the source files from the ISO file with the CD command. Then, run XCOPY *.* J: /e and hit Enter to start the copy. Be sure to replace J with the drive letter of your USB flash drive.


Using a physical Windows install DVD


The instructions are slightly different when using a physical DVD.  Open up command prompt and type XCOPY D:  J: /e and hit Enter. Replace D with the drive letter of your CD-ROM drive and replace J with the drive letter of your USB flash drive.


Step 5 - Installing Windows 7/8 from the USB flash drive


Once the file copy has completed you are ready to plug the USB flash drive into your computer. Turn it on and hit the keyboard shortcut to bring up the boot menu for your model. Typically it is F12 or F1. After you select your USB flash drive the Windows 7/8 installation should begin to load. At this point, installing Windows is the same as on a normal laptop or a desktop.


For More Details : http://tweaks.com/windows/39415/how-to-install-windows-7-with-a-usb-flash-drive/

Wednesday, August 15, 2012

AMD launch new processor call "Trinity"


AMD's Trinity Pictured, May Launch on October 1

Hermitage Akihabara has published the first images of AMD's upcoming desktop Trinity processors for the retail segment.
ZoomThe publication shows five different models, the dual core A6-5400K (3.6/3.8 GHz), as well as the quad-core models A6-5500 (3.2/3.7 GHz), A6-5600K (3.6/3.9 GHz), A6-5700 (3.4/4.0 GHz) and A6-5800K (3.8/4.2 GHz).
AMD is expected to launch its retail desktop Trinity processors in October. According to Hermitage Akihabara, the official launch date will be October 1.
All desktop Trinity processor integrate AMD's Piledriver CPU core as well as Radeon HD 7000 series graphics. The flagship processor, the A6-5800K with unlocked multiplier, will use a 7660D integrated GPU that uses 384 stream processors clocked at 800 MHz. The entry level 5400K gets a 7540D GPU with 192 processors.

Monday, July 23, 2012

Newest Intel processor and It's specification

3rd Generation Intel® Core™ i7-3770 Processor 

Intel® Core™ i7-3770 Processor

For a difference you can see and feel in HD or 3D, multitasking or multimedia, get the visibly smart 3rd generation Intel® Core™ i7-3770 processor with top-of-the-line performance for your most demanding tasks. With our best set of features, the Intel® Core™ i7-3770 processor is the ideal choice for whatever you want to accomplish—because the only thing more amazing than Intel® technology is what you’ll do with it.


Divider
Amazing 3D Gaming and Media Performance

Amazing 3D Gaming and Media Performance

  • Experience high-definition movies, shows, and games featuring Intel® Insider™,1 and Intel® HD Graphics.
  • Capture and share your favorite life moments with fast and easy photo editing and video creation with built-in visuals2  featuring Intel® Quick Sync Video and Intel® Clear Video HD Technology.
  • With Intel®Turbo Boost Technology,3  your PC can perform up to 2.9x as fast as its top-of-the-line predecessors did.

Divider
Do What You Want. Only Faster.

Do What You Want. Only Faster.

  • The Intel® Core™ i7 processors, with quad-core power, allow you to breeze through demanding tasks like archiving your high-resolution photos, building your audio library, or rendering a multilayered image file.

Want more? visit here


Wednesday, July 11, 2012

FEz Spider main bord and its Specification

FEZ Spider Mainboard is a .NET Gadgeteer-compatible mainboard based on GHI Electronics EMX module. This makes FEZ Spider Mainboard the most feature-full .NET Gadgeteer compatible device in the market. It contains all of .NET Micro Framework core features and adds many exclusive features, such as USB host, WiFi and RLP (loading native code). All these features combine to provide a rapid prototyping platform.
This board is included in FEZ Spider Starter Kit.

 
Key Features:
  • 14 .NET Gadgeteer compatible sockets that include these types: X, Y, A, C, D, E, F, H, I, K, O, P, S, T, U, R, G, B and Z.
  • Configurable on-board LED
  • Configuration switches
  • Based on GHI Electronics EMX module
    • 72MHz. 32-bit ARM7 processor
    • 4.5 MB Flash
    • 16 MB RAM
    • LCD controller
    • Full TCP/IP Stack with SSL, HTTP, TCP, UDP, DHCP
    • Ethernet, WiFi driver and PPP ( GPRS/ 3G modems) and DPWS
    • USB host
    • USB Device with specialized libraries to emulate devices like thumb-drive, virtual COM (CDC), mouse, keyboard
    • 76 GPIO Pin
    • 2 SPI (8/16bit)
    • I2C
    • 4 UART
    • 2 CAN Channels
    • 7 10-bit Analog Inputs.
    • 10-bit Analog Output (capable of WAV audio playback)
    • 4-bit SD/MMC Memory card interface
    • 6 PWM
    • OneWire interface (available on any IO).
    • Built-in Real Time Clock (RTC) with the suitable crystal
    • Processor register access
    • OutputCompare for generating waveforms with high accuracy
    • RLP allowing users to load native code (C/Assembly) for real-time requirements.
    • Extended double-precision math class
    • FAT File System
    • Cryptography (AES and XTEA)
    • Low power and hibernate support
    • In-field update (from SD, network or other)
  • Dimensions: W 2.25" x L 2.05" x H 0.5"
Power
  • Requires .NET Gadgeteer standard red modules to power the system like USB client DP.
  • Low power and hibernate modes
  • Active power consumption 160 mA
  • Idle power consumption 120 mA
  • Hibernate power consumption 40 mA
Environmental:
  • Operating temperature: -20 to 70°C
  • RoHS compliant /Lead-free compliant
For more information about .NET Gadgeteer visit:
http://www.netmf.com/gadgeteer/

these content is copied from 
http://www.ghielectronics.com/catalog/product/269

Wednesday, May 16, 2012

What is .NET gadgeteer

.NET Gadgeteer is a platform for creating your own electronic devices using a wide variety of hardware modules and a powerful programming environment.


WHAT IS .NET GADGETEER?

.NET Gadgeteer is a platform for creating your own electronic devices using a wide variety of hardware modules and a powerful programming environment.

A NEW WAY TO MAKE SOPHISTICATED DEVICES

Even someone with little or no electronics background can build devices made up of components like sensors, lights, switches, displays, communications modules, motor controllers, and much more. Just pick your components, plug them into a mainboard and program the way they work together. .NET Gadgeteer uses the .NET Micro Framework to make writing code for your device as easy as writing a desktop, Web or Windows Phone application.

AN OPEN SOURCE AND OPEN HARDWARE COMMUNITY PROJECT

If you're building projects with .NET Gadgeteer, you'll find inspiration and product information on this site. If you're interested in building .NET Gadgeteer hardware, you can find hardware interface specifications and core libraries at http://gadgeteer.codeplex.com. A variety of hardware vendors are building components for .NET Gadgeteer, so you’ll have a huge assortment of modules to choose from.


.NET GADGETEER HARDWARE

A .NET Gadgeteer system is composed of a mainboard containing an embedded processor and a variety of modules which connect to the mainboard through a simple plug-and-play interface. There are lots of .NET Gadgeteer modules available today, including: display, camera, networking, storage and a variety of sensors and input controls. New modules are being designed all the time!
The .NET Gadgeteer mainboard's sockets are numbered, and each is also labeled with one or more letters which indicate which modules can be plugged into it:

Friday, March 2, 2012

How to make a computer faster: 6 ways to speed up your PC

By following a few simple guidelines, you can maintain your computer, help increase your PC speed, and help keep it running smoothly. This article discusses how to use the tools available in Windows 7, Windows Vista, and Windows XP Service Pack 3 to help make your computer faster, maintain your computer efficiently, and help safeguard your privacy when you're online.
Note: Some of the tools mentioned in this article require you to be logged on as an administrator. If you aren't logged on as an administrator, you can only change settings that apply to your user account.

1. Remove spyware, and help protect your computer from viruses

Spyware collects personal information without letting you know and without asking for permission. From the websites you visit to user names and passwords, spyware can put you and your confidential information at risk. In addition to privacy concerns, spyware can hamper your computer's performance. To combat spyware, you might want to consider using the PC safety scan from Windows Live OneCare. This scan is a free service that helps check for and remove viruses.
Download Microsoft Security Essentials for free to help guard your system in the future from viruses, spyware, adware, and other malicious software (also known as malware). Microsoft Security Essentials acts as a spyware removal tool and includes automatic updates to help keep your system protected from emerging threats.
The Microsoft Windows Malicious Software Removal Tool is another utility that checks computers running Windows 7, Windows Vista, Windows XP, Windows 2000, and Windows Server 2003 for infections by specific, prevalent malicious software, including Blaster, Sasser, and Mydoom, and helps remove any infection found.

2. Free up disk space

The Disk Cleanup tool helps you to free up space on your hard disk to improve the performance of your computer. The tool identifies files that you can safely delete and then enables you to choose whether you want to delete some or all of the identified files.
Use Disk Cleanup to:
  • Remove temporary Internet files.
  • Delete downloaded program files, such as Microsoft ActiveX controls and Java applets.
  • Empty the Recycle Bin.
  • Remove Windows temporary files, such as error reports.
  • Delete optional Windows components that you don't use.
  • Delete installed programs that you no longer use.
  • Remove unused restore points and shadow copies from System Restore.
Tip: Typically, temporary Internet files take the most amount of space because the browser caches each page you visit for faster access later.
To use Disk Cleanup:

Windows 7 users

Windows Vista users

Windows XP users


3. Speed up access to data

Disk fragmentation slows the overall performance of your system. When files are fragmented, the computer must search the hard disk as a file is opened (to piece it back together). The response time can be significantly longer.
Disk Defragmenter (sometimes shortened to Defrag by users) is a Windows utility that consolidates fragmented files and folders on your computer's hard disk so that each occupies a single space on the disk. With your files stored neatly end to end, without fragmentation, reading and writing to the disk speeds up.
When to run Disk Defragmenter
In addition to running Disk Defragmenter at regular intervals (weekly is optimal), there are other times you should run it, too, such as when:
  • You add a large number of files.
  • Your free disk space totals 15 percent or less.
  • You install new programs or a new version of the Windows operating system.
To use Disk Defragmenter:

Windows 7 users

Windows Vista users

Windows XP users

Running Disk Cleanup and Disk Defragmenter on a regular basis is a proven way to help keep your computer running quickly and efficiently. If you'd like to learn how to schedule these tools and others to run automatically, please read Speed up your PC: Automate your computer maintenance schedule.

4. Detect and repair disk errors

In addition to running Disk Cleanup and Disk Defragmenter to optimize the performance of your computer, you can check the integrity of the files stored on your hard disk by running the Error Checking utility.
As you use your hard drive, it can develop bad sectors. Bad sectors slow down hard disk performance and sometimes make data writing (such as file saving) difficult or even impossible. The Error Checking utility scans the hard drive for bad sectors and scans for file system errors to see whether certain files or folders are misplaced.
If you use your computer daily, you should run this utility once a week to help prevent data loss.

Run the Error Checking utility:


5. Learn about ReadyBoost

If you're using Windows 7 or Windows Vista, you can use ReadyBoost to speed up your system. A new concept in adding memory to a system, it allows you to use non-volatile flash memory—like a USB flash drive or a memory card—to improve performance without having to add additional memory.

6.  Upgrade  to  Windows 7

If you try all the previous remedies and your computer still isn't as fast as you would like it to be, you may want to consider updating to Windows 7.

How To Save Electricity


When it comes to saving money on your power bill, people from Maine to California know the big ones: proper insulation, water conservation and turning down the thermostat can lead to major long term energy savings, but there are a whole slew of little known things you can do around the house that can lead to significant savings, as well. Let's take a look at a few of these secrets that can help you save money on electricity from now on.
Your Washer and Dryer Are Huge Energy Hogs!
We all know that the biggest energy hog in the average home is the washer and dryer. You can significantly reduce the amount of energy you use if you upgrade your machines to newer, EnergyStar certified models, but if that isn't in the budget, try tossing in a pair of dry hand towels into your next wet dryer load. Studies have shown you can reduce each dryer load by as much as 20 minutes with the inclusion of two simple dry wash cloths. If you don't have an energy efficient dryer, this will help you save money on electricity right away.

Don't Use the Heat Dry Option On Your Dishwasher
The dishwasher has become an indispensable part of the home, but if you are using the heat dry setting on your machine, you are wasting a ton of money. By using a product like Jet Dry, you can simply open the door to your dishwasher and allow your dishes to air dry without spots forming on your glasses. Heat drying is completely unnecessary and many newer models don't even have the setting for it any longer. By simply cutting out this one frivolous action, you can begin to save money on electricity almost right away.
Wash Your Clothes In Cold Water
If you are one of those people that always reads the labels on your clothes, you already know that, for the most part, darks prefer to be washed in cold water. According to most clothing manufactures, only white loads that have no black clothes in them at all should be washed on hot. If you really want to save money on electricity, wash all of your clothes on cold, including your whites, and simply run one cycle a month on hot with bleach to keep your whites bright. If the whole world stopped washing with hot water, we could save billions of dollars a year in energy expenditures.
Ask Your Energy Company For A Free Energy Audit
Finally, your local energy company may offer the best free energy saving program of all. Depending on which power company you have, you may qualify for a free appraisal of your home by an energy expert. A representative of your power company can visit your home and walk you through the various places in which you are leaking power. In most cases, the solutions are very simple and you can save money on electricity right away. Contact your power company today to see if this service is available in your neck of the woods.

Tuesday, February 28, 2012

How to Protect a PC in a Thunderstorm


  1. Unplug everything from both the mains and telephone lines.
    • The only proven protection from a lightning strike in copper cables (like the ones used in telephone lines) is a 30cm gap.
    • As we all know this isn’t always possible, the storm could hit in the middle of the night or when you are away from your property so what other measures can we take to try and protect us.
  2. The best way to protect your computer from lightning is to use a good surge protector. Don't be confused. A power strip, which is a simple strip of outlets, is not necessarily a surge protector. A surge protector may look like a simple strip of outlets, but it has built-in protection against power surges. When your home receives a power spike, the surge protector takes this spike and pushes it away from the computer.
  3. When buying a good surge protector (in French: protection contre les surtensions) look for the following features:
    • The surge protector should cover lightning strikes. Some do not.
    • If required, look for a surge protector that offers insurance to cover the loss of properly attached equipment.
    • If you have a regular modem or a router, buy a surge protector with a telephone socket where you can plug in your telephone line.
    • Many people fail to understand they need a surge protector for their telephone line. Phone lines are used to connect computers to the Internet through their modems and routers. It is widely believed that power cords are the source of all damaging surges to the computer; that's simply not true. Only thirty percent of damage caused by lightning enters through the mains cable. Phone lines carry the majority of surges to your computer.
  4. Take lightning strikes seriously. Even if your computer appears to be working you should still give it a check over in case the hit has left it in a dangerous state that might result in electric shock or fire. If you think that your computer has been hit by lightning, the first thing you need to do is to see if anything else has been damaged.
  5. Check the phone and other electrical items for damage. If a phone is damaged then assume that the lightning has entered your PC through the modem or affected your router. If other electrical items in your home have been damaged then assume the strike has entered your computer through the power supply.
  6. Unplug the computer (Very important!) and check the outside of the case for signs of smoke or burn marks (especially around the power supply at the back)
  7. Check the electric, telephone and network cables for signs of burning (this is why it’s very important to unplug before checking – you don’t want to be electrocuted by a damaged mains lead).
  8. Use your sense of smell. If you can smell acrid smoke from your computer or router that’s not a good sign.
    • If you can tick any of the above boxes then it’s pretty evident your computer has taken a hit and will need to be repaired or replaced. If your computer wasn’t running at the time it’s quite probable that your hard drive is recoverable, thereby preserving any important document, photos, etc. Then again you do have backups, don’t you?

Basic Facts about Electricity

How is electricity made?
It’s hard to imagine our homes without
electricity. There would be no TV, computer
or video games. You’d have to do your
homework by candlelight or oil lamps. You
wouldn’t be able to listen to your favourite
bands on the radio or CD player – instead
you’d have to make your own music!
What is electricity?

Electricity is a form of energy that starts
with atoms. You can’t see atoms because
they’re too small, but they make up
everything around us. There are three parts
to an atom: protons, neutrons and electrons.
Electricity is created when electrons move
from atom to atom. There are a number of
ways to make electrons move, but most
electricity is produced at power plants.
page

How do power plants work?
It all starts with a source of power. At
Yukon Energy, we use water to create most
of our electricity. That’s why most of our
plants are called hydroelectric facilities:
hydro means water. Power plants that
use water to make electricity are built
near rivers. Our Whitehorse plant, for
instance, is on the Yukon River.

All the wires are made of metal – usually aluminum
or copper. That’s because metal is a good conductor –
electricity travels through it easily. Water is also a
good conductor, and because our bodies are mostly
made of water, electricity can travel through us
easily. That’s not something we want to happen
though, because if we have electricity going through
us we’ll likely be seriously hurt or even killed. That’s
why adults warn you to stay away from high voltage
sites and to keep your fingers away from wall plugs.


Saturday, February 25, 2012

How to Prevent Electrical Shock

Electrical accidents are known to occur all the time. But there are ways that can help prevent an accident by being fully aware of managing electricity around you. Add to this a thorough knowledge of how electricity works and you can easily prevent shocks. Whether at home or the workplace, preventing electrical shock is quite possible if you just follow a few ground rules. Electrical shock occurs if a part of your body is instrumental in completing a circuit between two conductors or a grounding source.
Once you suffer a shock, the after-effect will vary as per the current flow and the path of the current through your body. If the voltage is high, then the injuries will certainly be grave. So the best thing is to know how to avoid getting electrical shocks. For one, avoid creating a circuit through yourself between a live and neutral or earth cable. Do not, under any circumstance, touch any electrical appliance with wet hands. And do not operate light switches with wet hands. If you happen to be working with electrical circuits, then you must make sure that the power is off and the fuses withdrawn. Always ascertain before hand that appliances, sockets, switches and flexes are in good condition before using them.
A little education regarding electricity can go a long way. You must be aware that voltage is the force that causes the flow of the current. Current is the amount of electricity that is flowing through the wires. And resistance slows down or stops the flow of current. The greater the resistance, the lower the amount of flow. A ground is a connection between the electrical current and the earth, and electricity always seeks a ground to earth. Remember these important tips when you happen to be working with electricity:
. Whenever you begin working on any electrical equipment, check, then double check, to be sure there is no source of electricity flowing.
. Always have a fire extinguisher within easy reach to use in case of emergency.
. Do not, under any circumstances, assume that someone else would have cut off the power source. You must check things for yourself.
. Contact a professional electrician to do extensive electrical work.
To be completely safe, you must follow these rules as they will help you prevent electrical shocks. Also, remember the little things like never to overload electrical circuits. Always check electrical cords for any signs of fraying or wear and tear. Keep all electronic equipment away from dampness and water. In case of an electrical fire, shut the power off and use a fire extinguisher on the fire. Never ever use water to put out an electrical fire.

General Hardware Troubleshooting Tips


Regardless of the problem there are a few steps that must be taken whenever troubleshooting a hardware problem. These may seem rather insulting to most people, but one must never forget to do them; if they are not done you might very well waste allot of time and possibly create a new problem from fiddling around in your computer chasing down a phantom. Here are some quick steps:
  1. Power Cords - Make sure that all of the power cords are firmly in place on all of the devices that could possibly be causing or attributing to the symptoms you are experiencing (i.e. If nothing shows up on the monitor make sure that the cords are attached to both the monitor and the computer itself). Then trace the cords back to the wall and make sure that the other end of the cord is attached to a power outlet or surge protector.
  2. Outlet Power - It is not uncommon to blow a fuse; if the outlet in question is not receiving power than you should not expect any of the devices connected to the computer to receive power. You can test this simply by looking at the device and seeing if any LEDs (Light Emitting Diodes) are lit. If there are no LEDs lit, try pluggin in a device that you know works into the outlet, such as a clock or radio.
  3. Power Button - This step goes hand-in-hand with the last step. Many people don't think to check for this because many computer devices stay on all of the time (i.e. monitors, printers, power supplies), and as such do not check the power button. Also, some devices have two power switches on them, and both must be in the "on" position in order for the device to work (i.e. there is a power button both on the front, and on the back of most computers).
  4. Communication Connections - Once you've settled that the power to your devices is fine, the next step is to make sure that the device has all of the connections needed for it to communicate. This step consists of making sure that these cables are firmly connected at each end, and that they are connected at the correct port/interface. Do not forget to check internal connections; if your computer has been bumped it is possible for some connections inside to pop loose.
  5. Device Configuration - This steps provides both hardware and software configuration. There may be jumpers or switches on the hardware that need to be configured. If these accidentally got moved or switched the device would fail to work properly. Also, most hardware ships with configuration software (i.e. Wireless cards); make sure that the software configurations are compatible with what you are trying to accomplish.
  6. Follow Instructions - Computers are not evasive when they report errors; all too often we just do not understand them, or are confused by the amount of information that is given. Many times there are suggestions on how to fix a problem accompanied with an error message. Simply follow the steps the message suggests; even if the suggestion seems to be ridiculous follow it so that you can discard it as a possibility.
  7. Windows Recognition - If you go into the Control Panel, open the System dialog, click on the Hardware tab, and then open the Device Manager, you will see a tree-like structure of all of the hardware that is attached to your computer. Look under the appropriate category (Monitors, Graphic Adapters, etc.) and click on the item/items that you are having problems with then click on properties. The dialog that opens will inform you if the operating system is having any know troubles with the device.
  8. Update Drivers - If possible, try connecting to the internet and going to the manufacture's web site to download the latest drivers for your hardware (this requires that you now the model specifications of your hardware). Often conflicts can arise when you install new hardware and software; although these are unanticipated, once found the developer will fix the problem and post updated drivers.
  9. Refresh Device Manager/Reinstall Device - This step falls into the "I don't care what the problem is, I just want it fixed" category. Open the device manager again and delete the devices that are not working properly. You will probably be prompted to restart your computer, if not restart it manually. When the computer restarts the hardware you deleted will be detected again and be reinstalled with the default configurations. If you cannot find the device in the device manager try to uninstall all software that came with it and reinstall using the disks that were provided.

Specific Hardware Problems

Dead CMOS Battery

On an older PC, it is normal for the CMOS battery to fail at some point in time. They usually last for many years, with over five years being the norm, at least on older machines. On a new motherboard, this sort of problem is usually a sign of a defect, although, you shouldn't worry about it if it appears only the very first time the board is powered up or after you replace the battery. Often, a dying battery will first manifest itself intermittently. Sometimes, you will boot with no problem. At other times, you will see an error indicating that the system doesn't match the configuration or you will see that the Date and Time settings on your computer are wrong. When the battery fails entirely, these errors will either come up every time you reboot, or your BIOS may report an error number with a message stating that the battery is dead. The solution is replacing the battery -- for detailed instructions for replacing the battery see the Replacing Hardware page.

Blank Monitor

This is a very common problem, and most of the time, it has a very easy fix. Follow the below steps:
  1. Power - Verify that the monitor has power and the power cord is firmly attached. Detailed instructions for accomplishing this task can be found above.
  2. Video Cable - Double check that the video cable is connected to the computer. If the cable has become loose you may need to push it back in and tighten the screws that hold it in place.
  3. Brightness & Contrast - Check the brightness and contrast controls on the monitor; It might have gotten bumped or changed accidentally. It may sound stupid, but this was one of the most common causes for people bringing their monitor in for repair when my friend work at a computer store. Most monitors have a button on them to reset all of the settings -- try pushing that.
  4. Swap Parts - If possible, try swapping with another monitor that is known to work and vice-versa. If your monitor works on another computer, than the problem, most likely lies with your video card and/or motherboard. If your computer works with another monitor it might be time to invest in a new monitor.
  5. Push In Video Card - Open up your machine and firmly push down on your video card so that you are sure that it is making contact with all of the contacts in the slot. If you computer was jumped and the screw that holds it down was not tight enough it could have come loose.
If none of the above fixed your problem you may need to do more research on your problem are use one of the strategies listed earlier.

Dead Hard Drive

Hopefully, the only time you will have encountered this problem is after you have installed a new IDE device, because other than being misconfigured, otherwise, your data is most-likely lost.

Thursday, February 23, 2012

Desktop Computer Buying Tips

Quick links
Introduction
Purchasing a home or business computer can be a big and sometimes costly decision. Below is a listing of helpful suggestions on what to look for and what to ask when purchasing a new computer.
New vs. refurbished / used
If you're looking to save money buying a used or refurbished computer can save you a lot of money. A refurbished computer is a computer that has been returned to the company has been checked out as good but cannot be sold again as new. All major computer manufacturers will have a refurbished section showing all their available refurbished products. Buying one of these computers instead of a new computer can save you hundreds of dollars.
In addition to refurbished computers individuals and companies for various reasons will also sell their used computers. When buying these look out for the following.
  • Verify it has no physical damage by inspecting the ports as well as the inside and the outside of the case.
  • Make sure you're getting what you pay for. See the below scams section for additional details.
  • Make sure computer comes with any CD's for the operating systems or programs that are promised to be installed.
  • Realize that many computer manufacturers will not transfer the computer warranty from the old user to you.
Mac vs. PC
The decision between buying a Macintosh and PC computer running Microsoft Windows is always a heated debate. See document CH001238 for a list of advantages and disadvantages of both of these systems if you're still not decided.
What to look for
When purchasing a computer it is likely that you will have a general idea of what you may like in the computer or how you would like to configure the computer. Below is a listing of the various components likely to be found in a computer and recommendations and tips when considering any of the below components.
DeviceShort recommendation
Case The case or chassis is often overlooked when buying a new computer. Below are some things to think about regarding the case.
  1. Do you want a desktop or tower case?
  2. Will the case fit on top of or below your desk?
  3. Will the drives be accessible or will they be positioned the way you wish them to be positioned?
  4. Does the case support the standards of motherboards, for example, the ATX motherboard standard? This is important if you wish to upgrade the computer in the future.
CD media Most newer computers today have an included disc burner in the computer. If you wish to make your own CD's / DVD's make sure the computer supports it.
Hard drive The hard drive will be the destination of all your files and information. Make sure you get a hard disk drive that will have plenty of available space and will run at speeds that don't slow the overall computer down.
MemoryMemory is one of the more important purchasing decisions on a computer. The more memory in the computer, the more efficient the computer will run.
Modem Depending on how you plan on connecting to the Internet the Modem may not be that important of a buying decision. Most users today are using broadband Internet, which does not require a modem. However, if this is not available in your area make sure your computer includes a modem.
Network card Almost all computers today have a network card or network option on the motherboard. The network card is what will allow you to share files between computers in your home and connect to a broadband internet connection.
ProcessorThe computer processor is and will always be one of the most important considerations when purchasing a computer. Today, with multiple CPU/Processor manufacturers, it may be more confusing as well as more cost efficient to look at all options for computer processors.
Sound card Today, the standard sound cards that are included with a computer are sufficient for almost all computer users. However, if you plan on doing sound editing / mixing make sure to look at the sound cards capabilities.
Video card For computer gaming the video card has become one of the most important factors behind memory and processor. If you plan on gaming with your computer make sure your video card GPU and video memory meets the requirements.
Brand of computer
There is no such thing as a computer manufacturer who has a perfect history with all its users. Therefore when it comes to recommending one brand over another it would be impossible for us to say who's better than the other. Instead we'd suggest relying off the below considerations.

Consideration Explanation
Add-ons All computer manufacturers will give you the option to buy additional accessories when buying a new computer. Keep the below in mind before buying these add-ons.
  • Make sure your buying accessories you actually need. For example, almost all new computers will include a keyboard and mouse. Also if you're upgrading from an older computer many of your older peripherals and accessories may be compatible with the new computer.
  • If you're buying your computer online, check elsewhere. Many accessories available through the computer manufacturer are sold at a premium price.
Documentation Most manufacturers today are reducing the amount of documentation included with their computer and substituting that documentation for online documentation. Make sure the documentation found online appears to be sufficient and that software and driver downloads are available if needed.
Hardware As mentioned in the above above what to look for section, make sure the hardware included with your computer meets your needs.
Return If the computer is purchased at a local retail store, can the computer be returned if unsatisfactory to that store or does it have to be sent to the computer manufacturer? If the computer is purchased online or through a mail order can it be returned if unsatisfactory?
Service
  1.  Is the service onsite, meaning a technician will come to your location to replace or fix a bad component. If the service is onsite, is it for the complete time of the warranty?
  2. If onsite is not offered, what is and for how long?
  3. Can the computer be taken to a local service center? If yes, what is the closest authorized service center?
  4. What is the time frame the service takes to occur? For example, if the computer has a bad component, what is the time it will take for a technician to come onsite and replace that component, or if sent in how long does it take? Finally, if that time frame is not acceptable, what is the company willing to do, for example, are they willing to provide you with a loaned computer.
Software
  1. Does the software include Microsoft Office or Corel Suite? These packages allow you to have a word processor and a spreadsheet. For the most users this should be an important consideration.
  2. Is it the full versions of the software or is the software a demo, trial, or shareware? Many companies will include programs that will expire after 30-90 days and require you to purchase the full program.
SupportWhile you can always contact Computer Hope for support, manufacturer support is also a very important consideration as if an issue arises with the computer you must be able to contact a support representative.
  1. Is support open 24 hours, 7 days a week? If not, what are the hours?
  2. Is support open on holidays? If not, what days are they closed?
  3. What support options are available? Phone? E-mail? Web? Chat?
Upgrade ability While this option may not be considered at first when purchasing a computer, it is an important consideration. When purchasing a computer make sure the hardware you may want to upgrade can be upgraded. Common upgrades for most users today include: Memory, Video card, and Sound Card.
WarrantyFinally, does the computer manufacturer offer a warranty? How long is the warranty? Does the warranty cover both hardware and software issues?  We highly recommend that a computer only be considered if it has at least an one-year warranty. Many cheap computers will only come with a 90-day warranty. Meaning if a part goes bad, you will have to pay for the part as well as the service. This may not be an issue for users who just need a cheap computer and are willing to replace parts and service the computer themselves.
Scams
Unfortunately, like anything, it is possible to be tricked or for computer companies to scam you. Watch out for the below common scams.
  • Get what you pay for - Make sure you're getting what you paid for. A common tactic is to overclock the processor, memory, or other component. This can be done by anyone with a little computer knowledge. For example, you may buy a 733MHz processor but instead get a 500MHz.

    To determine the processor speed, open the computer and look at the processor itself. Do not look at the processor through a software program or through BIOS as these values can be changed or tricked.
  • Legal software - When purchasing a computer, make sure it was legal purchased and the CD or other disc and its CD-KEY is included. Many end-users or small computer companies who build or sell computers may not provide you with legal copies of the software, which is illegal and may leave you with a fine or the inability to get updates.source

Hardware Maintenance FAQ

Hardware Maintenance FAQ

New computer equipment is usually sold with a warranty. The warranty typically lasts one year, but some vendors offer multiyear warranties. If the computer fails while it is under warranty, the vendor should resolve the hardware problems at no additional cost.

Q. What happens if the hardware fails after the warranty expires?
You have a problem and you are on your own. Here are some of your options:
  • Fix the hardware yourself if possible.
  • Pay a company to repair the hardware.
  • Replace the entire system.
  • Stop using the system.
Q. Should I try to fix the hardware myself?
If you have the technical skills to diagnose the problem, and if you have spare parts or spare systems available, then swapping parts may resolve the problem.
If parts are not available, then you can purchase parts. However, parts can be expensive. There is no guarantee that the part that you purchased will resolve all the problems. Sometimes it is cheaper to buy an entire used system than to buy a part.
You also should decide if you want to spend many hours trying to diagnose a problem.
Q. Why shouldn't I call the vendor and pay them to repair the hardware?
If you have to pay for Time and Materials, the costs can add up very quickly.
It is not unusual to pay $150 per hour or more just for labor. There is no limit to the number of hours that it may take to resolve a problem.
As an example, here are the Time and Materials rates from an unnamed OEM:
$350 for the first 30 minutes of labor.
$64 for each additional 15 minutes of labor or $256 per hour.
Parts are extra.
Some companies charge for travel time and have a minimum charge.
Parts can be expensive. CPU boards, backplanes or power supplies can cost thousands of dollars.
This is an unexpected expense and funds may not have been budgeted for an emergency repair.


Q. Should I replace the entire system instead of repairing it?
If the system is inexpensive, it may be better to replace it rather than to repair it. If an older PC fails, it makes sense to replace it with a new, faster PC that costs a few hundred dollars and that has a warranty.
However, if a server that costs hundreds of thousands of dollars fails, it cannot be easily replaced and should be repaired.
If a new replacement system is not very expensive, say less than $8,000 and if it comes with a three year warranty you should compare the following:
  • How much would a maintenance contract cost for three years.
  • How much would a new system with a three year warranty cost.
If the difference is not very large, it may be better to buy a new system, and to keep the old system as a backup or for parts.
Q. Should I just dump this broken system.
If you can move the functionality to another system without affecting performance. The broken system can be kept for parts, or can be sold or dumped.
Q. I do not like any of the options above in case of a hardware failure. Is there a better alternative?
You can get a hardware maintenance contract from a company.


Q. What is a hardware maintenance contract?
It is a service sold by a company that protects your computer hardware. If the hardware in a computer fails while it is covered by a maintenance contract, the service company should resolve the problem at no additional cost to you. It is the same concept as an extended warranty. You are basically buying insurance to protect your purchase.
There are two types of maintenance contracts: On-site and Depot.
Q. What is on-site maintenance?
A technician is sent to your location. The technician diagnoses the problem and has or orders the parts. The technician installs the parts and checks that the systems working properly. This is the best type of contract.
Q. What is depot maintenance?
A service company will just ship you the part that you need. You need to first diagnose the problem, call the service company and order a part. Then the part is shipped directly to you and you need to install it in your system. Then you need to pack and ship back the defective part. This can be a time consuming process.
Q. What are the advantages of a hardware maintenance contract?
You do not have to pay for parts or labor every time that the computer breaks down.
The computer is fixed by a technician and you do not have to spend time resolving this problem.
There are fixed yearly costs that can be budgeted. There are no surprise expenses for emergency repairs.


Q. How much does a hardware maintenance contract cost?
Usually between 10% and 20% of the list price of the computer. But of course there are many variables that affect the price, for example your location and service levels.
Q. Why does a hardware maintenance contract cost so much?
Computer services are very profitable for the computer corporations. The OEMs generate revenues by selling services together with the equipment to their customers.
Q. How can I lower the cost of a hardware maintenance contract?
You can get a contract from a third party company. These companies charge much less than the OEMs.
Q. How much can I save by getting a third party contract?
It varies. The prices are negotiable. On volume contracts you could get up to 85% off the list price from the OEM.
Q. How can I get the lowest maintenance prices?
You should get quotes from multiple third party maintenance companies and you should let them bid against each other. These companies will match or beat prices from other companies. It is interesting to watch how low prices can go when there is competition. But you should not expect an OEM to match the low prices from third party companies.
Q. Where can I find a list of third party hardware maintenance companies?
3PHW.com LLC (Third Party HardWare) has a list of these companies. There is a US national category, US regional category and International category. The URL is:
www.3phw.com
This web site can email your quote request to many of the third party hardware maintenance companies, this is a free service. All the information that you need to provide is your email address and the equipment that you would like to put under contract. These companies will then contact you directly.
Q. What should I look for in a third party maintenance company?
You should look for a large company with many technicians. The technicians should be trained to support your equipment. This company should keep spare parts in your area.
Q. What are the advantages of using a third party maintenance company?
Low maintenance prices.
A third party company can support equipment from different manufacturers and can assume responsibility for multivendor problems. It is better to have only one maintenance contract instead of multiple contracts.
Q. What are the disadvantages of using a third party maintenance company?
There could be problems with the quality of the service or the availability of parts.
Q. What about the quality of the service from a third party maintenance company?
It depends on the skills of the technicians in your area. Usually the technicians will have training on equipment from multiple manufacturers. But it general, they will be lower paid technicians and they will not be top notch. However, the most important issue is if they can deliver replacement parts on time.
Some corporations like Sun[TM] do not have they own service technicians. If you get a SunSpectrum[SM] service contract and you place a hardware service call, you will get a third party maintenance technician from companies like Decision One[TM].
Q. What about the availability of parts from a third party maintenance company?
You should find out if parts are stored locally or if they will be flown in. If they are not stored locally, you will not get the parts the same day. Sometimes it is possible to request that spare parts be stored on-site. However you need to have the space and assume the responsibility for these parts.
Small third party maintenance companies may not keep many parts in a warehouse and may have to buy a replacement part when your system fails. That means that your system may be down longer.
You should find out where the replacement parts for your system will be stored and how long it will usually take to deliver them to your site.

Sunday, February 19, 2012

Windows 7 - Convert a Dynamic Disk to a Basic Disk

What is Dynamic disk?

A Dynamic disk is a physical disk with features that basic disks do not have, such as support for volumes spanning multiple disks. Dynamic disks use a hidden database to track information about dynamic volumes on the disk and other dynamic disks in the computer. Dynamic disk management is a data/hard disk management method on the Windows platform, first introduced with Windows 2000 operating system.


What is basic disk?

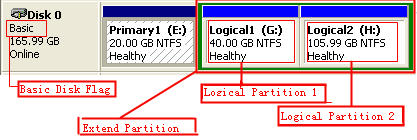
Basic Disk uses Partition Table to manage its partition. One Basic Disk contains both primary partitions and extended partition, and many logical partitions are contained in extended partition.You can see clearly as follow:
basic disk


What's the difference between Basic and Dynamic Disks in Windows XP/2000/2003/Vista?

Microsoft Windows XP, 2000, Server 2003, and Windows Vista offer two types of disk storage: basic and dynamic disk.

Basic storage uses normal partition tables supported by MS-DOS, Windows 95/98/Me/NT/2000/Server 2003 and XP.

Dynamic storage is supported in the Windows XP Professional, 2000 and Server 2003. A disk that has been initialized for dynamic storage is called a dynamic disk.
Dynamic disks are not supported on portable computers or on Windows XP Home Edition-based computers.


Why you need to convert dynamic disk to basic?


There are some problems in using dynamic disk, namely the disadvantage of dynamic disk.
  1. After you change a basic disk to a dynamic disk, the dynamic disk cannot be changed directly to the basic disk without third-party tools in case.
  2. Installing a multi-system on a disk and convert the disk to dynamic disk will lead one of them to be abnormality or failure at startup. so the best way is not to convert basic disk to dynamic disk in multi-system cases(multi-system exists on one disk).
  3. Dynamic disks cannot be accessed by Windows 98/XP home and Dos bootable disc. Suppose that there is a problem on your system to startup, here you want to repair the system errors very difficulty.
  4. In fact, the superior of dynamic disk can not be brought for the system partition. Spanned Volume and Striped Volume are able to expand the capacity of volume through using the unallocated space of multiple disks.
  5. The problem is whether Windows Vista/2008 and Windows 7 can be installed on dynamic disk or not. In order to guarantee data’s security, their installation program dose not allow operating system is installed on dynamic disk. so we suggest that you can first employ Dynamic Disk Converter to convert dynamic back to basic, and then install system to avoid data having been damage.

There are several ways of convert dynamic disk to basic disk

In Windows, it is easy to the conversion of basic disk to dynamic disk, but convert dynamic disk to basic disk very annoying. This topic is the summary about converting dynamic to basic disk. There are the three ways to complete this work for you.
  1. Convert to basic disk via deleting all volumes on the dynamic disk.
  2. Convert to basic disk via using Partition Recovery Software.
  3. Convert to basic disk by using Dynamic Disk Converter.

The first way: Convert to basic disk via deleting all volumes on the dynamic disk

Tip:
This way is the simplest and most commonly, and it most can not guarantee data security, so you need to back up all the data on all the volumes on the dynamic disk you want to convert to a basic disk.

Principle:
After backing up data, delete all the volumes on the dynamic disk by using Windows Disk Management, and then convert dynamic to basic.

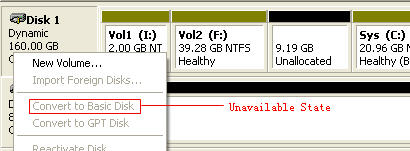
1 . First, let us to see the following graph:

Delete All Volumes

By the above graph, we have saw "Convert to Basic Disk" that is unavailable state if there are volumes on the dynamic disk, so we cannot revert it to Basic Disk.


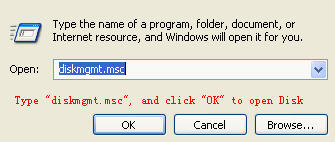
2 . Log on Windows as Administrator Privilege please, click Start Menu -> Run, and type "diskmgmt.msc" to input box, and press Enter key or click OK to open Windows Disk Management as shown:

Delete All Volumes


3 . On Disk Management opened, delete all the volumes on the dynamic disk in turn.

Delete All Volumes

Here, respectively, to delete the volume (I:), volume(F:) and volume (C:) on the dynamic disk.


4 . After the deleting, right-click the gray area that contains the disk title on the left side of the Details pane. For example, right-click Disk 1 as follows:

Delete All Volumes

After does not any volume on the dynamic disk, the "Convert to Basic Disk" item will be available, now you can change the dynamic disk to basic. And then, copy the previous backup data to the basic disk.


Important Note:

The way only suit that there are multiple disks on your system, and you have to boot operating system on other disk to complete this conversion (The other disk means is that the disk you do not want to convert). The main reason is that the volume that the operating system lays can not be deleted. Otherwise, it isn't easy to back up dynamic disk, so you’d better employ like "Copy Dynamic Volume" tool to backup. http://www.bestshareware.net/howto/convert-dynamic-disk-to-basic-disk.htm

YoUr CoMpUtEr